
Whether you’re an eCommerce craft seller or a blogger, you know just how important great visuals are. From product images to in-context shots, amazing imagery is the key to clicks, followers, shares, and sales. The secret to great photography is all in the setup; you don’t need the skills of a professional photographer or the best equipment out there.
These 5 simple steps will help you get your home studio ready.
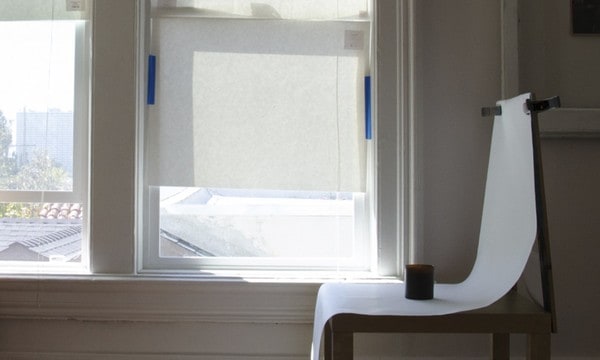
1. Pick a Spot by a Window
Unless you’re familiar with studio lighting, stick to natural lighting for your home photography studio. It requires less equipment and not as much technical skill.
The key to using natural lighting for your product photography is to use it indirectly, which is why shooting near a window is always a better option than shooting outdoors. If you find that the light coming through the window is too bright, you can diffuse it by covering the window with a white sheet or taping paper to the window pane.
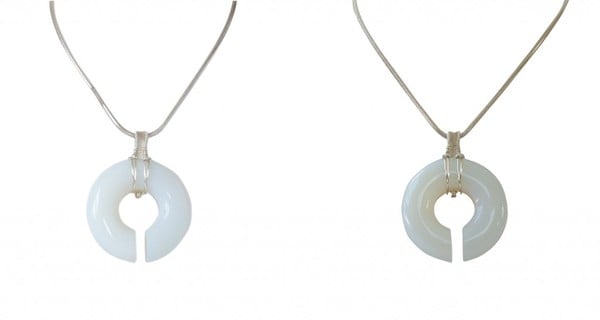
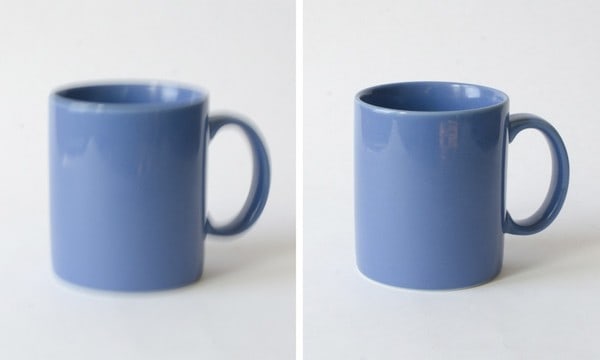
Avoid shooting during the early morning and late evening; everyone loves a beautiful, color-streaked sky at sunrise and sunset, but this ‘golden hour’ won’t do your eCommerce or blog images any good. During these times, the intensity of the light changes quickly, so you’ll be left with inconsistent photos, and the warm light will give your photos an orange tinge.
If you look at the necklace below, the left photo was taken in the early afternoon, whereas the right photo was taken during the golden hour. This has made the white charm look cream-colored, and the silver chain appears gold. The picture is still good quality — it’s simply a misrepresentation of the product.
You want to set up your home photography studio so that the window is on the left or right of the product and not behind or in front of the camera.
2. Set Up a Sweep
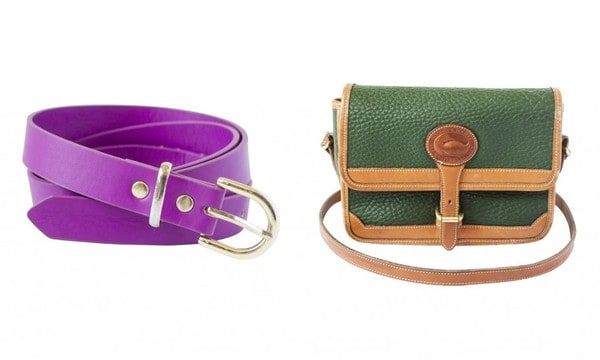
First things first – shoot against a white backdrop. White will reflect the natural light onto your product to give you a well-lit image. Darker colors will absorb the light and leave the photo overexposed or blurry upon closer inspection.
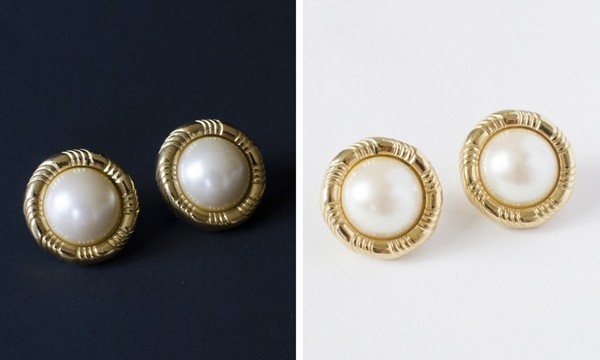
White is also the secret to amazing (and accurate) colors. Different light sources have different light temperatures, and although the midday sun is more neutral than during the golden hour, it’s not pure white. In real life, our brains adjust to these color temperatures so that regardless of what temperature the light is, we can identify the true color of things. Digital cameras can only guess, and they do this by using a white element in the photo as a reference point. You need to shoot against a white backdrop for your camera’s white balance calibration to be on point.
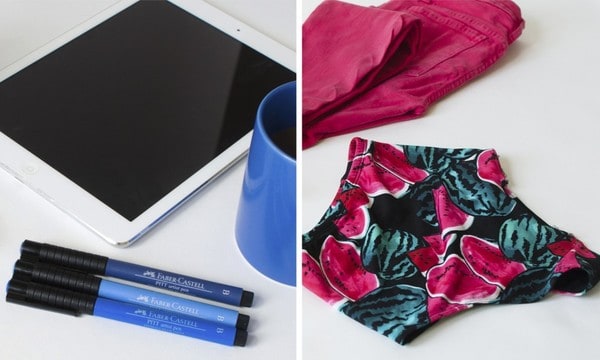
Look how amazing and bright all of the blues and pinks look in the photos below.
On top of that, white will draw attention to your products; whether you’re an eCommerce seller or a blogger, the subject of your photographs needs to stand out, and a white backdrop is the best way to do this. If you’re selling your products online, you should place your products on a white background for an extra professional touch.
You can make a sweep out of any white material, like a bed sheet or a large roll of paper. I like to use plain white wrapping paper because it has a nice reflective quality. This material should ‘sweep’ from the vertical to the horizontal surface, creating a seamless transition. The tricky part is fixing the sweep to the vertical surface, and how you do this should depend on the position of your window, the amount of space you have to work with, and the type of products you’re taking photos of. Note that the sweep should always be sufficiently larger than the subject of the photo.
If you’re taking photos of smaller products, you’re at an advantage because you won’t need as much room for your home photography studio. I highly recommend making a little shooting table; it’ll give you a lot of flexibility and control with your light source because you can easily move it around.
You will need the following:
- one small square or rectangular table
- two thin pieces of wood (around 2ft tall)
- one pair of spring clamps
- one hammer and package of nails
Nail the wooden strips vertically to the table, and clamp the sweep to the top of the wooden planks. Let the sweep fall across to the table surface. It’s that easy.
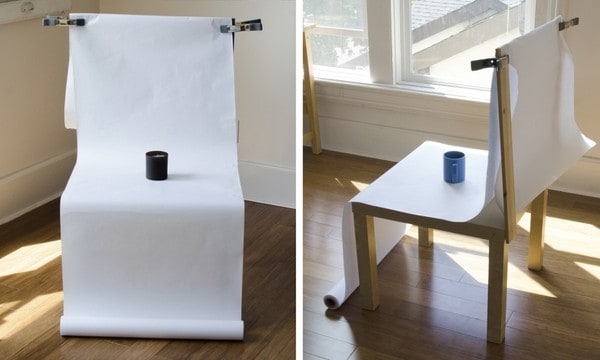
If you’re shooting larger products or photographing a model, you’re in luck if your window is close to the intersection of two walls. You can just tape the sweep to the top of the wall and let it fall down (although you will need a bigger sweep than you would for a shooting table!) If this isn’t an option, you’ll need to get creative. I’ve used a bookshelf, a CD rack, and a ladder before and each has worked out fine.
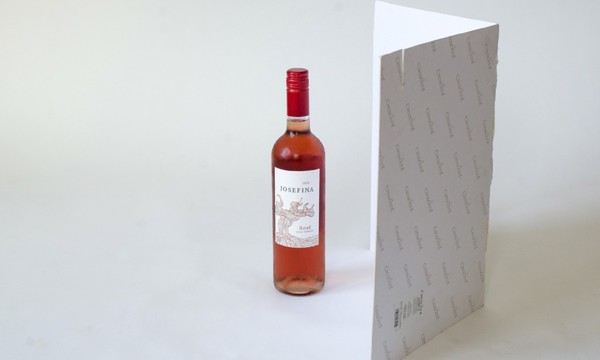
3. Use a Fill Light
As mentioned above, you want the window on either the left or right side of your product. To even out the lighting and prevent harsh shadows, place a fill light or reflector on the other side of your product, opposite the window.
You can make a fill light yourself by folding a piece of white card in half and standing it up – the more reflective the material, the better.
However, if you’re going to use your home photography studio more than once or you’re shooting large products, go ahead and invest in a reflector. Reflectors are much easier to use and produce much better results.

4. Steady Your Camera
The secret to tracking sharp images is a steady camera. You can use any hard, stable, and even surface, but you can find tripods under $50 that’ll make adjusting the position of the camera a lot easier and give you a lot more freedom with the angles you shoot from. You do get what you pay for with tripods, but you won’t need the best of the best for your home photography studio. If you plan on shooting anything from above, for example, a flat lay for your blog or a bird’s-eye view of a product, you’ll want to make sure you get a tripod that is tall enough to do so.
If you’re using a smartphone to take your photos, I’d suggest buying a smartphone mount. It cannot be denied that a DSLR will take better photos — you get what you pay for. But if you nail your setup, you can still take amazing photos on a smartphone. The newer ones have great cameras; just make sure you turn off the flash, adjust your focus (by tapping the screen) and avoid using the digital zoom.
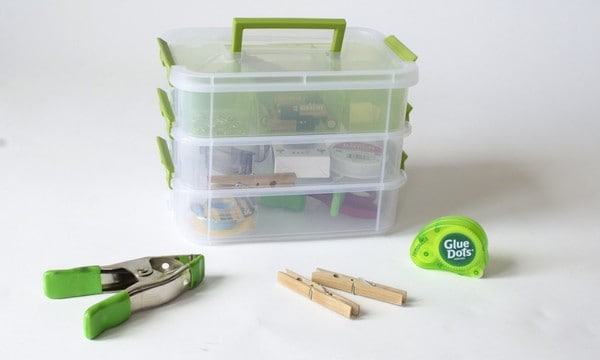
5. Have a Photographer’s Toolbox on Hand
You can never be too prepared for a photo shoot, so it’s a good idea to keep some emergency items on hand.
A great ‘photographer’s toolbox’ should contain:
- tape to keep your products in place (double-sided tape works best)
- pencil and paper to help you plan, map out, and take notes as you go
- clamps to hold heavier items up
- fishing line for photographing small items that need to hang
- pocket scissors to cut your tape and fishing line, any loose threads, etc.
- glue does work great for propping up delicate products like rings
- clothespins/pegs to make clothes fit perfectly on your model or mannequin — just peg them in the places hidden from the camera
- safety pins to keep the fabric in place
- an iron in case any fabric is wrinkled
- batteries and chargers (because we all know how unpredictable technology can be)
Conclusion
And that’s it! Follow those five simple steps, and you’ll be able to create your own home photography studio that’ll help you take amazing photos for your blog or eCommerce store!
Holly is the Founder and CEO of Pixc, an on-demand photo editing and optimization service. She has years of experience in both building and managing eCommerce stores and growing a large social media following. She loves shopping, beautiful images, and unique typeface. Follow her on Twitter @hollyccc.


Excellent article, thank you!
Glad you enjoyed the tips, Lilly!
Great tips and pictures. Is it similare thinking when doing lighting for video? Or att there some other things to think about?
Thanks for a great post!
Br Angela
Hmmm, I’m not sure. I would think so if you’re doing a v-log of yourself.
Hi Holly,
Love these tips! I’ve been looking for ideas to improve my photos. This is going to help me out a great deal. What I like about it most is, it doesn’t look expensive to put it together.
Thanks for the suggestions! Hope you’re having a great week ladies.
Cori
Glad you enjoyed the tips, Cori. I’ve been experimenting more on Instagram, so Holly’s tips have come in really handy and they’re easy!